Showing posts with label Tutorial. Show all posts

Thursday, January 31, 2013

Colorful Spring Look


Hello everyone!

In this post, I want to show you this look that I created that represent spring.  I am so looking forward to spring because I want to see flowers blooming again and most importantly, I am so done with the cold weather. LOL

I know that I have been missing and not posting any posts for awhile.  I was sick for over a month and then while I am recovering, my baby was sick so I have to focus my attention to our health and getting better so I kinda took a break that I didn't plan on taking.  I really miss blogging so now that I am better and hopefully stay healthy, I will blog more often like I did last year.  To all my lovely readers, thank you very much for your patience, I truly appreciate it.

Well without further ado, this is the link to the video for colorful spring look.  If you like the video, don't forget to subscribe!


Products I use,

Face,
Moisturizer, Lancome
Foundation, Revlon Color Whipped Foundation
Eye brow: Concrete, MAC
Eye Primer, Too Faced Shadow Insurance
Bronzer: Too Faced Chocolate Soleil
Blush, MAC
Eye shadows: Lime Crime Magic Dusts in Circus Girl, Lime Crime, Empress and Shoe Addict
Wet and Wild, A glass to shine: (all matte products) I use the brow bone color.
The Watts highlighter by Benefit
Eyeliner: pencil in perversion as well as liquid eyeliner in perversion
Mascara: Too Faced LashGasm
Lipstick MAC Angel topped with MAC Nikki Minaj lip glass Limited Edition


This is the final look.  What do you think?


I just love the combination of the colors.


The total close up look.  :)


This is another angle of the look.  Because of my teeny little eyes, you won't be able to see the whole look such as pictured above lol so I decided to show this angle, that way you can see the total look including the eyeliner which you will hardly see otherwise.  Ha Ha


Well that is all.  What do you think? I really love this look and I hope you do too.  Leave me a comment and if you like my video, don't forget to subscribe :) Thanks so much and thank you for visiting.


Thursday, December 20, 2012

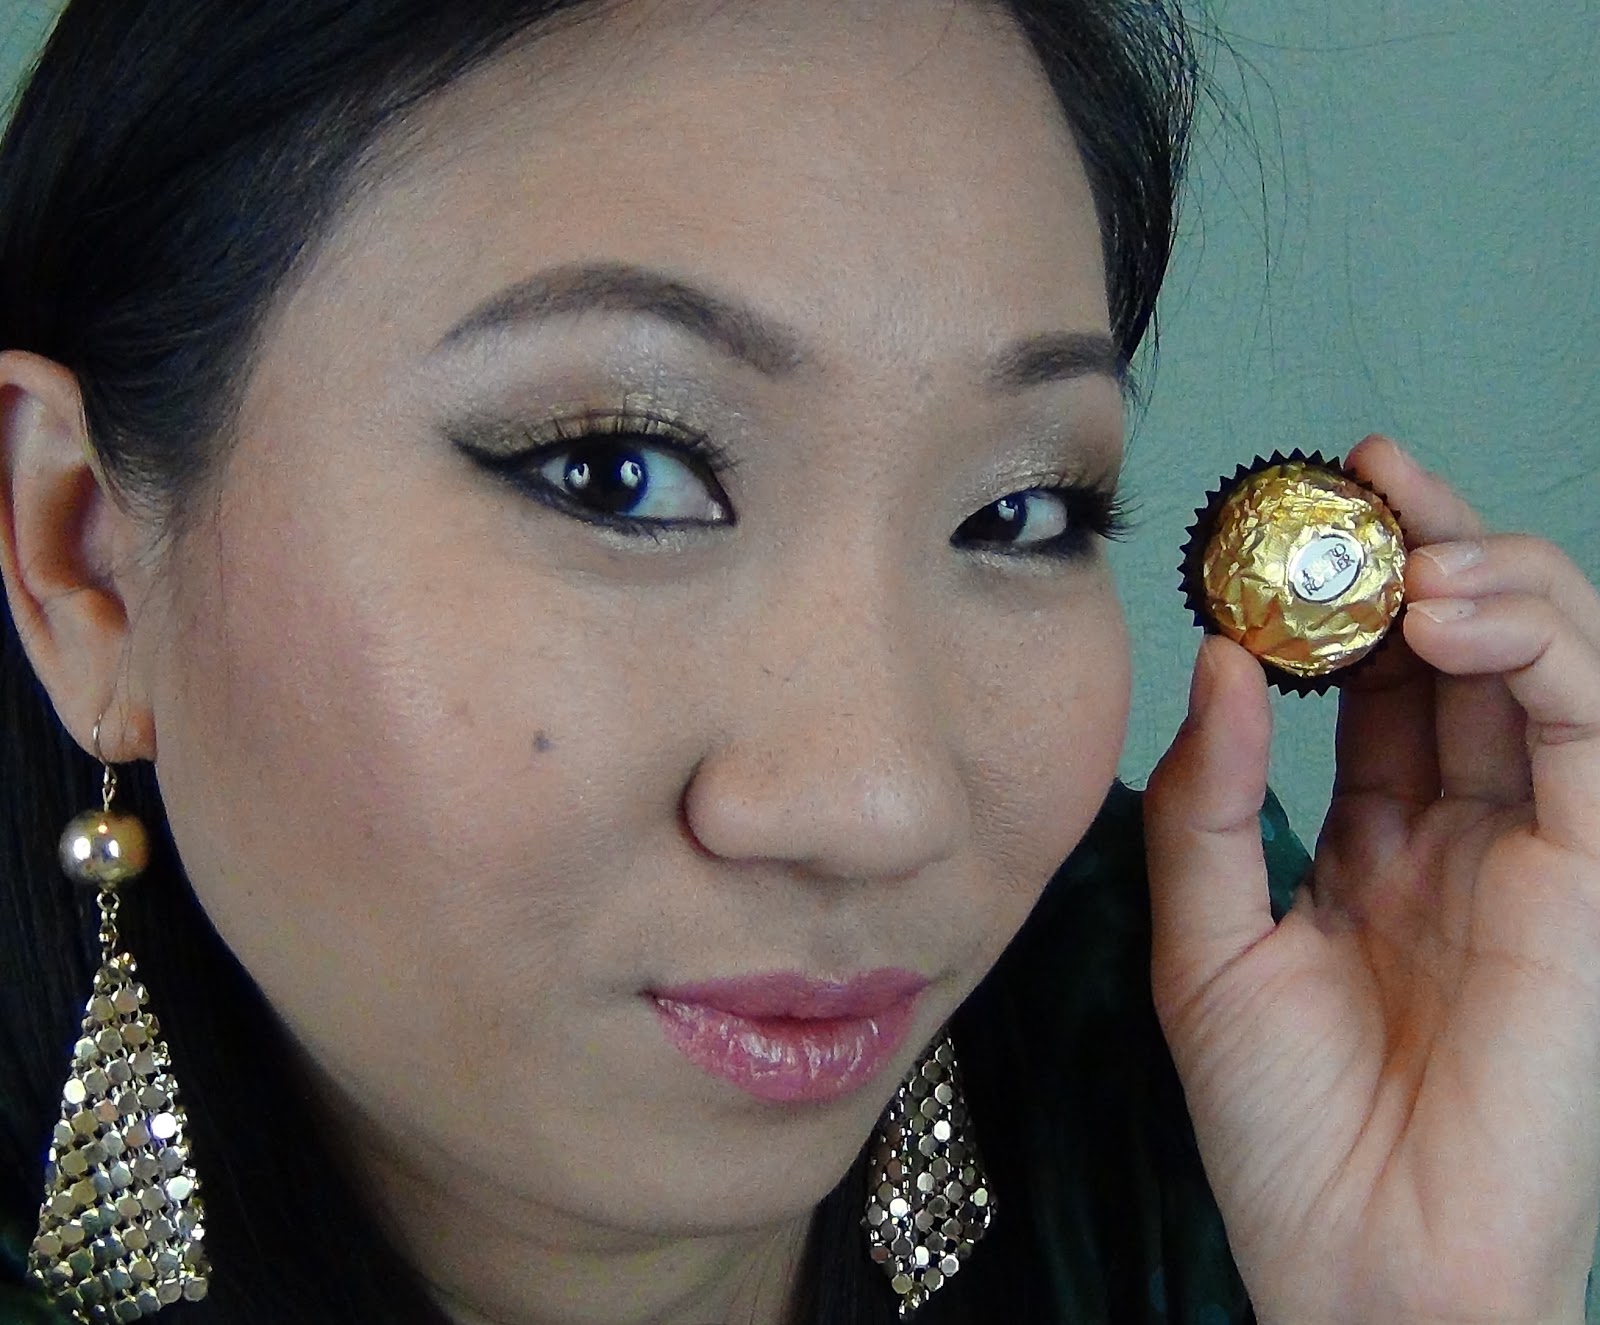
Ferrero Rocher Inspired Look


Hello everyone!

Gosh Christmas is so close now and I am so busy with last minute gifting and trying to not miss anyone.  This is one of the reason why I have been slow in blogging and giving responses in my blogs.
Anyway, today I just want to show you my Ferrero Rocher inspired looks.

See I got a Holiday Treat Box from Influenster and in it, to my surprise, is Ferrero Rocher.  I was super excited when I saw it because I love Ferrero Rocher.    So, when I made a video review of Ferrero Rocher,  I just have to share with you guys my looks that I created while filming this video.

If you are wondering what is Ferrero Rocher, it is this amazing combination of  whole hazelnut surrounded by chocolaty cream within a crisp wafer all enveloped in milk chocolate and finely chopped hazelnuts and it is awesome.  If you never try one, you should try it and after that you probably will be blaming me for getting you addicted to this wonderful snack.  Haha.  I made a review video of Ferrero Rocher as well, check it out!


Here is the link to it:

http://www.youtube.com/watch?v=KcdCo4Hcj68


Well let me just show you the look I create for this video.   I use Naked Palette 1 to create this look and lipstick I got from my glossybox for my lip.


Gold is the major theme for this look because Ferrero Rocher has a gold wrapper for its chocolate and it is just so fancy and expensive looking.


What I did with my eyes, I start with smog at the crease using pencil brush, half baked in the middle using the all over lid brush, sin in the inner lid, toasted at the outer lid then top it with combination of smog and darkhorse with the pencil brush and create a V-shape.  I then use naked to blend smog in my crease and Virgin to highlight my browbone.
For my bottom eyes, I use sin in the inner lid, smog and darkhorse combined on the rest of my bottom eyes.
I create an cat eye for the looks with perversion eyeliner, I also line my waterline with perversion.  I then apply fake eyelash.


For my cheeks, I use Nars orgasm, and I use MAC bronzer from the glamour daze palette holiday collection.
Lip: I use the lipstick I get from glossybox, I believe it is called Glossy Pink.  I really love this lipstick and have been using it plenty of times.


Here is just the final look with my Golden Gift box.
This look is very easy to create and won't take you long to do so I hope you like the look.


Just one final picture to show my love to this awesome chocolate treats.


That is all for today and let me know what you think about this look.  Do you like it? Am I missing anything?
I honestly love this look because it is neutral but at the same time very vibrant gold look that can be used for party or just everyday look.

Leave a comment if you like and Thank you for visiting! Happy Holiday everyone.

Friday, November 30, 2012

A simple and Easy smokey look using beauty products you owned


Hello everyone!!

Today I am doing a tutorial on a smokey look using the products you already have in your beauty collections.  Yay! No need to buy new product and it is really pretty inexpensive as well as quite simple to achieve.   I hope you like the video it and pls do leave a comment so I know that you guys are liking the video or click on " like".   Better yet, subscribe to my videos and let me know what you want to see more in my future videos.  I will be more than happy to do a video request.

Click below to see more about my upcoming giveaway.  Yes it is here because I finally have 100 subscribers on my Youtube video.  YAY!!! Thank you so much for all the supports you all have shown me.  I am nothing without your supports.  I love you all so much and to show my appreciations to you all, I am giving away beauty products as as well as jewelry.  It really is going to be an awesome giveaway.  I did not post on my blog nor do videos for a week I believe because I am trying so hard on my very first giveaway.  Yes I am very nervous but excited at the same time.  I hope you all will participate in my giveaway and I wish you all the best luck!  Oh and it is going to be an International GIVEAWAY because I know I have some awesome supports from my international readers as well as subscribers so it feels really wrong of me if I didn't include you guys in it.  The giveaway will start sometime next week, yes I am sorry, I need more time so I hope you guys can be patient with me and understand.


Products I use in this video:

Face:
Revlon Color Whipped Foundation

Cheeks:
Too Faced Chocolate Soleil for Bronzer
Nars Orgasm Blush

Eye brow: MAC Concrete

Eyes:
Too Faced eye shadow in Nice Ash
Wet and Wild Palette (Black Matte)
Urban Decay Perversion Eyeliner Pencil 24/7
Urband Decay Liquid 24/7 Liquid Eyeliner in Perversion

Lips:
MAC lip pencil
Sienna Lip gloss in Sugar and Spice.


Here is the final look:


This is the up close look of the eye:


Here are some previews of the giveaway!


The sponsored JEWELRY giveaway:
This giveaway is sponsored by SEPHENE Jewelry.   I will post a blog about Sephene Jewelry next and you will see that her products are all hand made by her using 100% natural Silk.  The owner of this amazing products is a lady named Angela Desisca.  She, in my opinion, is a triple threat lady.  She is not only a business owner, she is also a blogger as well as makeup artist.  Woooahhhh I have no idea how she does it all but she does it all.  How did she find the time?  Ok back to jewelry giveaway,
So, instead of us picking the jewelry, Angela is very kind in letting the winner to pick one of your favorite from her collections so why don't you check out her collections already and pick your favorite. Here is the link to her jewelry page: SEPHENE JEWELRY

In term of beauty giveaway:
Have you guys seen the new Naked BASICS by Urban Decay? *gasp* I am in love.  Well I am in love with Urban Decay anyway lol it is no surprise that I, of course, have one.  So, my question is do you guys want the New Naked BASICS or the colorful Urban Decay Skull Palette. I guess you guys can pick whichever one you want and let me know when I post my giveaway.

The Tokidoki brush set will also be in the giveaway.  I did a review on this set.  You can check it out HERE
and 3 Tokidoki lip glosses will be included in the giveaway as well as some more stuffs that I am trying to get everything together.  I will post those in the upcoming post so pls be patient with me and stay tuned.

That is all at the moment and Thanks for visiting! XOXO


Tuesday, October 30, 2012

Simple smoky look using drugstore brand New York Color (NYC)


Hello everyone,

In today's post, I just want to post a video of how to create a simple soft smokey look using drugstore brand, New York Color (NYC). Because so many of you like the simple smoky look that I posted in my post, HERE, many of you requested for the video tutorial of this look so here it is! I hope you like it and pls don't forget to subscribe :) I am so close to reaching 100 subscribers in my Youtube channel so if you have not subscribe, make sure you do for the reason that I am going to do a giveaway once I reach 100 subscribers.  For all of you who have followed me from the beginning, your support means the world to me and I thank you so much from the bottom of my heart! Pls know that I love you and appreciate everything! XOXO

Without further ado, here is the link to the video.  I hope you like it.


Face:
YSL Foundation
L'oreal True Match Blendable powder
Concealer: Erase Paste by Benefit in Medium

Brow: MAC Concrete

Cheek: MAC Gentile
           Too Faced Chocolate Soleil for bronzer
Lipstick: Glossybox in glossy pink and Sienna gloss in sugar and spice

Mascara: Badgal Lash
Fake Eyelash: KISS no 5

Eye pencils: Urban Decay Perversion
                   Too Faced lash lining tools

Thanks for visiting you guys! XOXO

Wednesday, October 17, 2012

No Mirror Makeup Challenge.


Hello Everyone!!

In today's post I am just going to show you the video that I uploaded.  It is a video about using no mirror to do your makeup.  It has been going on around for quite some time and I have been tagged by fellow bloggers to do this.  I honestly was afraid to do this challenge because I was so afraid that I am going to mess up so badly that I won't have the courage to upload the video haha.  My sister also has been bugging me to do this video but she meant it in a nice way.  She really wants to push me out of my shell  and just go do it.  It is not until I saw another fellow youtuber doing this and she was encouraging me to do it that I finally said to myself oh what the heck.  If I mess up, at least I will be entertaining my viewers right? All of you out there who I adore and love because you watch my videos and support me so why not entertained you guys in return.  So here it is and I truly hope you enjoy it.  I didn't do as well as I want to honestly :( but oh well.

Honestly, I truly enjoyed doing this video.  It was such a great challenge and way to recognize every little part of my face.  The detailed that I never even think I knew, I actually knew!  In addition, it really heightened my senses especially my sense of touch.  I felt the stroke of the brushes, pencil but at the same time the suspense of not knowing whether or not I drew my face right was so much fun.  Haha

Well you will be the judge of how I did in my challenge and I challenge all of you even if you are not a youtuber, have fun in your own comfort to challenge yourselves to do this.  Trust me, you will honestly enjoy and be entertained by yourselves in this challenge.  If you want to video it and upload it on youtube for the world to see and join the rest of the youtuber who have done this challenge whether they did it well or failed, go right ahead.  Why not entertain the world right? well of course this is your decision to make.  :)

Well without delaying much longer, here is my video and pls comment below or in my youtube and let me know how I did. You be my judge, C+, B-, D ? You tell me.  Oh and if you like my video, pls don't forget to subscribe.  Your support means the world to me and I truly appreciate it which is why if you have any request at all, I will try my best to do it.


Products I use:

Face:
Primer  (Feels like skin base)
Mischa BB Cream
MAC Studio Fix
Benefit Erase Paste concealer
Ofra brow pencil

Eyes:
Eye love palette in Naked Eye (Satin Sheets and Like A Virgin) by Too Faced.  I added Ever After in my outer lid just for the fun of it LOL
Urban Decay 24/7 Glide On Pencil in Perversion


Cheeks:
MAC mineralize blush in Gentle
Too Faced Chocolate Soleil


Lips:
Perfectly Pink by Glossybox (I love this pink! such a perfect pink for me)
Sienna Duo Lip Gloss that I received in my Glossybox.
 
I hope you enjoy it! Thank you for visiting.


Tuesday, October 16, 2012

Urban Decay The Vice Palette and EOTD


Hello Everyone!

How are you all doing? I want to apologize for not posting for about a week.  Honestly I think my body was just telling me that I need some rest because every night for 5 nights in a row I was literally fell asleep while putting my little one to bed.  I was asleep with him. Ha Ha so of course with that, I got nothing done.  I only do my blogs and videos at night when my boys are asleep because that is the only time for me to be able to get things done without having to worry about them or their needs.  Then, when I was about to start writing a new post, my husband is missing our "date" time so he literally just took me and said drop everything, we are going on a date.  Hence, I dropped everything and just went with him on a date.  Again, nothing done. However, my health, my body, and my family are the most important thing in my life so I have to listen to them first, don't you agree?  I hope all you truly understand.  :)

Well without further ado, I want to show you in this post the new amazing holiday palette from Urban Decay.  It is called The Vice.  I am sure most of you have heard about the buzz regarding this palette.  It is 20 brand spanking new colors all put in one palette.  All 20 of them and the colors as always are superb. Urban Decay holds true to its image, brand and promises.  It is unlike their previous palette where they will put a few new colors and the rest are repeat colors.  This palette has all brand new colors in them that packed on amazing pigmentation.

Why don't I just show you the pictures of these gorgeous colors alright?

This is how the palette looks like.  I forgot to take off the white cover that protect the logo.  Sorry :(  The logo comes in this beautiful crystallized UD for Urban Decay logo and purple felt palette cover.  It is lovely and nice because when you put this palette on a table, it won't slide off the table.  It is also comes with a button where you just push it and the top will slowly open on its own.  How cool is that? No longer have to open it ourselves and sometimes accidentally drop them. Oh I hate when that happens.  This new packaging is awesome, just put it on your table or vanity and push the button, voila! it opens slowly with this huge mirror ready for you to use.  Awesomeness! However, with felt packaging, as we all know it, it is also very easy to get dirty.


This is how all the lovely colors packed into one palette:

Simply gorgeous don't you think?


I will show you the colors one by one now :) as you can see personally close up of all the beautiful colors this palette gives.


This is Desperation.  It is a greyish taupe brown matte-satin.  This is a great blending color too for your crease.


This is Muse.  Love the name. A dark reddish brown with golden and multidimensional shimmer.
Pretty for everyday natural look.


This is Jagged.  Every time I see this, it reminds me of "Move like Jagger" song. Haha I know it is different but the name s quite similar.
It is a matte black base with gold metallic.  Enough said.  Anything gold always look nice.  This is great for everyday smoky eye.


Hey Blitz here!  This is a bright gold metallic.  Perfect to use on your inner lids especially during the holiday.  Simply pretty.


Hello I am Penny Lane.  Nice to meet you.  LOL Penny Lane is a bronze metallic with gold glitter.  This is perfect for Fall make up.  It is bronze yet metallic.  So pretty.


This is Junkie.  Oh I love Junkie. I first fall in love with this color from the 24/7 glide on pencil.  So gorgeous.  It is one of my favorite color pencil of all time.  Junkie is a dark green-blue with gold shimmer.  The color is so unique but so beautiful at the same time.


This is Chaos.  Chaos is vibrant royal blue with subtle shimmer.  It is vibrant alright!  I create a look with this color and love it so much.  I will post the picture below.


This is Unhinged.  It is electric turquoise blue metallic.  You guys know how much I love turquoise.  This color is so stunning.   I combine this with Chaos, they are perfect for each other.  They literally compliment each other.


This is Occupy.  Occupy is dark grey-blue metallic.  Very pretty for smoky eye look.


This is Black Market.  I love the name.  It makes this color looks so dangerous, mysterious yet incredible at the same time.  It is a dark charcoal black matte-satin.  Perfect for any smoky look you want to create.  A little goes a long way. Love it!


This is Provocateur.  Ohh sounds so sexy, dangerous yet dirty at the same time. Don't you think? Provocateur is light greyish pink with lots of multidimensional glitters.  You guys know how much I love glitter.  I use this in the inner lid to highlight and showcase the eye look I create.


This is Rapture.  Rapture is dark greyish purple with lots of multidimensional shimmer.
This is simply just a pretty light purple.


This is Vice.  Vice is a dark eggplant with red shimmer.  So pretty and vibrant.  I am looking forward to create purple eye look with this color.


This is Noise.  It is a dark reddish pink metallic with big gold glitter.  Oh how do I express how much I love this color.  It is like woodstock but better.  It has gorgeous glitter in it that just shows up so well when you put it on your lid.  I love it.


This is Armor.  Armor is greyish brown metallic with silver micro glitter.  Simply lovely don't you think?  Suits its name.  It literally remind me of a shield, if this makes sense to you guys.  lol


This is Nevermind.  Nevermind is a light taupe brown shimmer.  This is a great highlight color for your brow bone and cheeks.


This is Echo Beach.  Echo Beach is light wheat-champagne shimmer.  This is also great for highlight. You can even use this to create a 3D look for your lip.  Stunning.


This is Anonymous.  Anonymous is light whitish-pink nude matte.  Use it to highlight your brow bone and inner lid or to create a "no makeup look"


This is Free bird.  Free bird is a light peachy pink with a silver micro glitter.  A great color for highlight or to add a little shine to your eye look.


Last but not least, this is Laced.  Laced is a pinky taupe matte.  I love this color.  It is such a pretty color to create natural makeup look especially for "Makeup no makeup look"


The palette also comes with a double ended brush  which I am so totally love.  I know a lot of people prefer the 24/7 pencil to be in it but honestly, if you like their pencil, most likely you already have a stash of collections in your closet but I bet you don't have their full brushes collection unless you are a die hard UD fans. With that said, I believe it is more appropriate and convenient to have their brushes in the palette so you don't have to worry about not having the tool to use the palette (when travelling.)


Here are the swatches:


This is the first and second row:
Desperation, Muse, Jagged, Blitz, Penny Lane
Junkie, Chaos, Occupy, Unhinged, Black Market


This is the third and fourth row:
Provocateur, Rapture, Vice, Noise, Armor
Nevermind, Echo Beach, Anonymous, Freebird, Laced


All these colors are superb.  I love this palette so much.  I have been playing around with these palette pretty much all week.  Here is one of the look I created using this palette.


The Full Look:

Start with UDPP, then I took Desperation to define my crease.  I then use Nyx Milk jumbo pencil all over my lid then add Unhinged on the inner and outer lid.  I add Chaos in the middle lid.  Then I took Black Market on the outer lid to create the smoky look.  I finished the look by lining it with perversion 24/7 pencil.  On the bottom eye, I use unhinged and junkie combined for the outer lid and nyx jumbo pencil in baby blue for the inner lid.  I use Perversion as well for the waterline.  For the brow bone, I use Anonymous.


I just love the Blue.  Thank you UD for making this palette and the amazing colors.


I seriously love this look so much, I actually use this to go to the opening of our very first Casino in our town.  Let's just say the look lasted all day and I get lots of compliments from the ladies. Holla!!!


From another angle.


Well that is all from me then on this post.  I hope you guys love this palette as much as I do as well as the look I created with this palette.  Thank you for visiting! XOXO

To purchase this palette, you can visit Urban Decay, Sephora, and Ulta

Until next time!


Friday, October 5, 2012

Tutorial on Romantic Eye Look with a Twist of Colorful and Glittery Eyeliner


Hello everybody!

Finally it is here! The tutorial video on how to create a classic romantic eye look that involves some twist of FUN in your eye makeup.  It is not too much and you can still wear it for day or night.  Many of you have asked me to do a video tutorial on it so without further ado, just watch it.  So simple and easy.  Also, if you like my video, pls do not forget to subscribe.  Your subscription and support are very important to me and truly are appreciated.  Thanks Dolls!  I HEART you all so much! XOXO


Click on the link below will ya.  Somehow it doesn't want to post the video here yet.

http://www.youtube.com/watch?v=y7sx6vTM748&feature=youtu.be


Products used:

Eyes: Romantic Eye Palette from Too Faced
Eyeliner: Perfect Peacock, Urban Decay Perversion and Too Fash Lash Lining Tool.
Primer: Urban Decay original

Face:
YSL foundation
Erase Paste
Bronzer: Chocolate Soleil

Brow: Espresso by MAC
Cheek: Stila self adjusting pink
Lips: Kryolan Glossy Pink from Glossybox
Mascara: New York and Smashbox

Brushes: Sigma

Monday, October 1, 2012

Julep Matte Nail Polish


Hello everyone!

How was your weekend? Mine was so much fun.  My husband and I took the kids to Maize, Maze and Berries.  It is basically a place where there is maze, pumpkin and berries picking, dodge ball fun, laser tag, feeding the animals and so on.  We spent 4 hrs there and the day was just so beautiful.   You couldn't ask for a better day to spend the day outdoor.

Well let's get back to topic.  The topic today will be Julep matte nail polish.  Have any of you owned matte nail polish? What do you think of it? I own a few and I gotta admit, when I first try matte nail polish, I was like, mehhh not for me.  However, as I see more colors come out and people started coming out with their ideas on how to incorporate matte and glossy together, I was intrigued and loving the whole matte nail polish.


Then one day, I was at Sephora and saw that Sephora finally carry Julep nail polish and not only that, the nail polishes that are on the shelves are matte suede finish.  Ohhh I was excited to try them so I did and man! from the very first time I saw it on my nail, I am hooked.  I want those nail polishes so bad.  So I bought 2 of them.  There are many more colors but the price is too much for me to spend on a nail polish.  I bought 2 so that really speaks how much I wanted them.

Here is a little information about Julep:
     "Founded by beauty expert Jane Park, Julep celebrates friendship, expression, and connection through color.  Applying her professional beauty advice--often featured in leading fashion magazines--Park develop a nail polish collection with colors named after inspirational, vibrant women.  Julep's fast-drying, long lasting, non-toxic formula is paired with a high-performance, professional brush.  Additionally, the brand donates a portion of their proceeds to  organizations that support and empower women."  (taken from Sephora website) 

Without further ado, I will show you the two colors that I got and swatches of them as well as how I wear them.

Here is Minka:


Minka is this red based bronze color with silver shimmers.  I know you must be wondering how in the hell can you put shimmers in it when the result is going to be matte.  Well you will see on the swatch below.


One coat of Minka.  If you like soft polish, you can just be done with one coat.  Amazing how opaque it is right.  So pretty.


2 coats of Minka.  The difference isn't really much.  It just shows a slightly deeper color.  Still gorgeous!


Now here is the second nail polish that I purchased:


Amber is this beautiful yellow based silver yet bronze looking color and also with silver shimmers in it.  It is so pretty!


One coat of Amber.  Nice don't you think? for those of you who likes soft colors, you need to get these two colors.


Two coats of Amber.  Similar to Minka, the color with 2 coats really isn't that obvious.  It only adds a deeper color to the polish.


This is just a look at a different angle.


The colors are just too pretty.  Can you see the shimmers?  It is there but at the same time, it looks matte.  Amazing isn't it? A different look to typical shiny glossy nail polish with glitters and shimmers.  I love the look these two nail polishes create.  It is such a unique looking color.  The nice thing about this polish is that you don't have to put top coat (of course) because if you do then it will not be matte any longer but glossy so because of not having to put top coat, the drying time is shortened.  Actually the drying time of these two nail polish is incredible.  The drying time is 15 secs tops but to be safe, wait for a minute, just one minute and you touch it, it won't smudge or leave any fingerprints.  Incredible!  The not so nice part will be because it dries so fast, you gotta move fast. If you are too slow with it, it will dry on you so I am not so sure people who are used to taking their time to put nail polishes will like this as much as others who like it quick drying and know how to put nail polish with a single stroke.  (you know like those nail technicians)  So just beware that when you are putting on these polishes that you just have to be a little quicker than usual.  (Not much just a little)


Here what I did after I am done with my swatches.  Yes I will wear my nails like these for awhile because I am so in love with the colors and I am not going to waste my nail polish especially not these because they are not cheap so I am going to make the best of it by wearing them for days. Haha


I just added French tips to them.  I saw this at Sephora billboard and these two combination colors are what caught my eyes and I love it so much.


This will be what on my right hand.  Yes  I know these two are two different colors and different french tips.  Hey that is why it is so much fun to be wearing them.


So at $14 with only 0.27 fl oz (8ml) , it is just ridiculously expensive.  :( I bought it because I want it so much.  However, I love the packaging.  It is unique unlike any other nail polishes though it is fragile.  I know this because my baby broke one of my Julep nail polishes (luckily I didn't spend $14 on it) when he decided to throw it against another nail polish. (yes my little bunny loves to hang on to my nail polish, different color in each hand too lol) I love the drying time however as I explained it above, it can be a pain when you make a mistake and not have enough polish and dip it the second time because by the time you want to brush the polish, the previous polish already dried on you and it can create a messy look if you are not careful yet quick at the same time with it.

Well those are some of the things you should know before you want to purchase Julep.  I purchase mine on Hautelook and I bought them all half price except these two.  I bought them full price and it hurts to spend it but worth it at the same time.  You know what I mean? probably not. Haha oh well! just know that I will store these two in a much higher place so my baby won't get a hold of it and break it.

Ok guys that is all for now.  Which look do you like better? the silver french tips or the red french tips? Also which color do you like better? Let me know on the comment below!

Thank you so much for visiting.  Take care.  XOXO